A broken weld nut can disrupt your project and weaken your structure. Fixing it requires the right tools, safety measures, and welding skills. This guide walks you through removing the damaged nut, preparing the surface, welding a new one, and inspecting your work. You will also learn how to prevent issues and when to consider alternatives or call a professional.
Safety First: Protect Yourself and Your Workspace
- Eye Protection: Wear safety glasses during grinding, drilling, and metal handling. Use a welding helmet with the correct shade:
— Shade 10-11 for MIG welding
— Shade 8-10 for TIG welding - Ventilation : Work in a well-ventilated area. Welding and grinding produce fumes and dust harmful to lungs.
- Fire Safety: Remove flammable materials from your workspace. Keep a fire extinguisher nearby during welding or grinding.
- Workspace Setup: Use a stable, well-lit workbench. Keep tools and cords organized and out of walkways.
- Chemical Safety: Wear gloves and work in fresh air when applying penetrating oils. Avoid heat sources near flammable chemicals. Never heat penetrating oil above manufacturer-recommended temperatures (usually below 120°C/250°F).
- Grinding Safety: Use the correct disc for the task: cutting discs for cutting, grinding discs for smoothing. Always check disc RPM ratings to match your grinder speed. Ensure guards are properly positioned to protect from sparks and debris.
Tools and Materials Needed
- Welding machine (MIG or TIG)
- Welding helmet and gloves
- Angle grinder with appropriate discs (4.5-inch discs common)
- Drill with bits matching weld nut and bolt sizes (commonly 1/4″ to 1/2″)
- Penetrating oil (e.g., WD-40 Specialist, PB Blaster)
- Wire brush for cleaning metal surfaces
- Pry bar and hammer
- Pliers
- Heat gun (optional, with temperature control and safety precautions)
- Safety glasses and ear protection
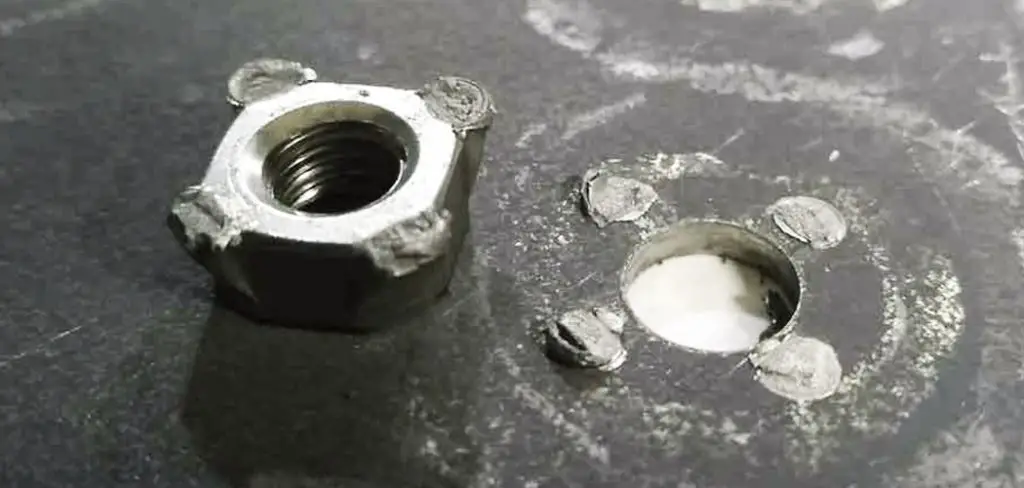
Understanding Weld Nuts and Selection
- Types of Weld Nuts
- Hex weld nuts: Six-sided, welded flat to metal.
- Tab-base weld nuts: With tabs for extra grip.
- Threaded inserts: Screw into holes, no welding needed.
- Rivet nuts: Installed with special tools, no welding.
- Material Considerations:
- Steel: Strong, widely used.
Stainless steel: Corrosion resistant, used outdoors.
Aluminum: Requires AC TIG welding and specialized equipment; not recommended for most DIY welders.
- Steel: Strong, widely used.
- Load Capacity: Refer to manufacturer datasheets or standards such as ASTM A325 or ISO 898-1 for load ratings. For example:
- M6 steel weld nuts may handle 5-8 kN shear load, depending on weld quality and base metal.
- Thread Pitch and Size: Match the weld nut’s thread pitch exactly to the bolt used to avoid stripping or loosening.
Causes of a Broken Weld Nut
- Incorrect hole size or threading
- Excessive vibration loosening the nut
- Poor welding technique or excessive heat
- Corrosion weakening the weld
- Low-quality or counterfeit nuts
Step 1: Removing the Broken Weld Nut
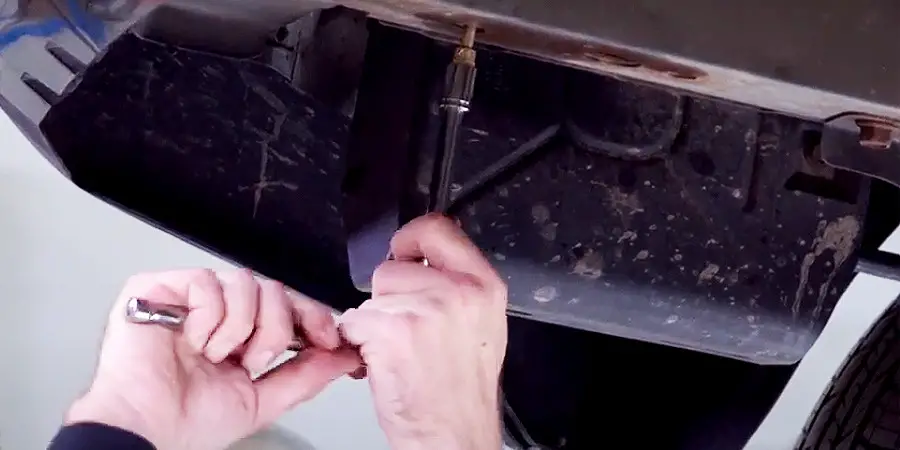
Method 1: Penetrating Oil and Pry Bar
Spray penetrating oil and wait 10-15 minutes. Remove the bolt if possible. Use a pry bar to move the nut. For light parts, get help to hold steady. Apply gentle heat with a heat gun below 120°C (250°F) to loosen stubborn nuts.
Method 2: Grinding and Hammering
Apply oil and wait. Cut the bolt partially with a grinder. Tap with a hammer to loosen. Add oil as needed. Remove the nut when loose.

Method 3: Drilling and Prying
Spray oil and wait. Grind the bolt head flat. Drill a hole in the nut’s center. Insert a pry bar and twist to loosen.
Step 2: Surface Preparation
- Remove all rust, paint, primer, and coatings before welding. Primer or paint must be fully cleaned off as they cause toxic fumes and weak welds.
- Use a wire brush and grinder to expose clean, bright metal.
Grind to create a flat, smooth surface for welding. - For corrosion-prone areas, apply protective coatings only after welding and cooling.
Step 3: Installing the New Weld Nut
Minimum Base Metal Thickness
For reliable weld nut installation, use base metal at least 1/8 inch (3 mm) thick. Thinner materials may require tab-base weld nuts, threaded inserts, or rivet nuts.
Method 1: Hex Weld Nut Installation
- Drill a hole sized to fit the weld nut precisely.
- Insert the bolt through the nut and hold it securely with pliers to keep it aligned during welding.
- Weld the nut flush to the surface, ensuring full penetration of the weld bead into both the nut and the base metal for a strong bond.
- Remove the bolt and grind the welds smooth for safety and aesthetics.
- Always wear gloves and safety gear during welding.
Method 2: Tab-base Weld Nut Installation
- Mark two spots for drilling holes for the tabs near the original hole.
- Drill holes that fit the tabs snugly.
- Thread a smaller bolt and galvanized wire through the nut and holes to hold it in place.
- Weld the tabs fully to the base metal, ensuring complete fusion.
- Remove the smaller bolt and install the correctly sized bolt.
Welding Technique Details
- Amperage Settings:
- MIG welding 1/8″ (3 mm) steel: Use 80–100 amps with a wire feed speed of 200–300 inches/minute (varies by wire type).
- TIG welding 1/8″ steel: Use 60–80 amps DC.
- Welding Angles:
- Maintain a work angle perpendicular (90°) to the joint.
- Use a travel angle of 10°–15° in the direction of welding.
- For MIG welding, use push technique for better penetration and cleaner welds; pull technique creates more penetration but more spatter.
- Welding Sequence: Use short weld passes to avoid overheating and warping.
- Cooling: Allow welds to cool naturally. High-strength steels may require controlled cooling to avoid cracking.
Troubleshooting Common Issues
- Misaligned Holes: If holes are misaligned, you can use oversized weld nuts or carefully re-drill holes to correct alignment.
- Oversized Holes: Fill the gap by welding additional metal before installing the weld nut.
- Thin Base Metal: Use tab-base weld nuts, threaded inserts, or rivet nuts instead of standard weld nuts to avoid distortion or failure.
- Painted or Coated Surfaces: Ensure complete removal of coatings before welding for strong welds.
Prevention Tips
- Match hole sizes and thread pitches correctly during the initial installation.
- Regularly inspect weld nuts for signs of cracks, corrosion, or looseness.
- Keep the welded area clean and dry to reduce corrosion risk.
- Use thread lockers only on removable bolts, not on weld nuts that are permanently attached.
Alternative Solutions
- Helicoil Inserts: Repair stripped or damaged threads inside holes without welding.
- Rivet Nuts: Provide a threaded fastener without welding, ideal for thin materials or inaccessible areas.
- Through-Bolting: Use when both sides of the material are accessible. This method offers strong fastening but requires clearance behind the workpiece.
- Professional Repairs: Recommended for critical structures, hard-to-reach weld nuts, or when specialized equipment is needed.
Quality Control and Inspection
- Inspect welds for full penetration, uniform bead, and no cracks or porosity.
- Use torque wrenches to test bolt tightness according to size specifications (e.g., M6 bolt torque ~10 Nm).
- Replace weld nuts if threads or welds show wear.
- Document repairs for critical applications.
When to Call a Professional
- Weld nuts are located in hard-to-access or confined spaces.
- Base metal is thin, damaged, or difficult to weld.
- You lack proper welding equipment or experience.
- The repair is for a safety-critical or load-bearing structure.
Estimated Time and Cost
- Removing the broken weld nut: 15 to 30 minutes, depending on difficulty.
- Surface preparation: 10 to 20 minutes.
- Installing and welding the new weld nut: 20 to 40 minutes.
- Cost: Varies widely based on equipment rental, material costs, and whether professional services are used. Weld nuts typically cost between $1 and $5 each.
Conclusion
Repairing broken weld nuts requires proper tools, safety awareness, and sound welding techniques. By following this detailed guide, you can remove damaged nuts, prepare surfaces correctly, weld new nuts securely, and inspect your work for lasting results. Prevent future problems with proper installation and maintenance. When in doubt, consider alternative fasteners or consult a professional.
Feel free to share your questions, tips, or experiences below to help others succeed in weld nut repairs.