Are you searching for a comprehensive and simple guide for nailing 3-tab shingles? Look no further, as this article is here to provide you with the necessary information and tips. This article will provide you with the answer you need.

Where Should Nails Be Placed on 3-tab Shingles?
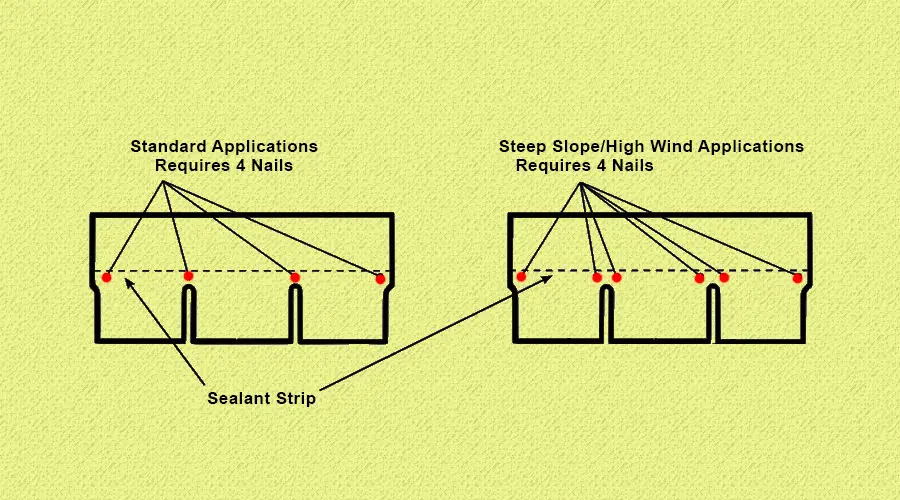
When installing 3-tab shingles, you should place the nails in the upper corners of every slot or tab where the sealant strip joint is.
The number of nails you use per shingle depends on the type of shingle and the area in which you are installing them. Generally, you should use four nails in common roofing areas, and six nails should be used in areas that are more exposed to the wind or have a steeper slope.
Step-by-Step Process of Nailing 3-Tab Shingles
I will explain the process in a simple way. So let’s start –
Step 1 – Align the 3 Tab Shingles
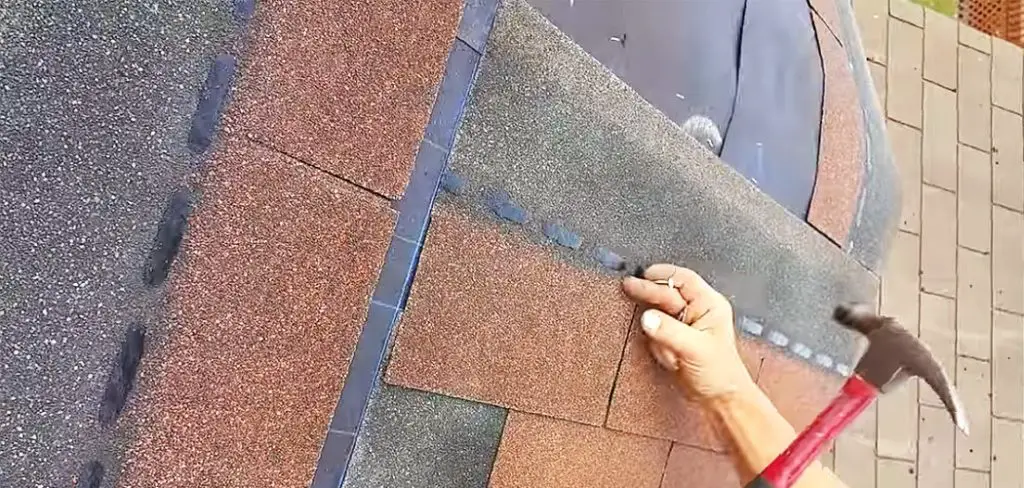
Position 3 Tab Shingles on the roof, ensuring that all shingle edges are aligned and a gap of 6 inches between them. The arrangement should be similar to the image below.

Step 2 – Ready Nailer Tools
Prepare the nailer tools by setting up the nail coil, as it is easier to work with than a hammer. If you don’t have a nailer, you can use a hammer.
Step 3 – Start Nailing
Starting from the bottom row, use a nail gun to insert nails in the upper corners of each tab where the sealant strip meets with the tab. Make sure only to use the necessary quantities of nails, and keep them 90 degrees straight (flush with the shingles). Be careful not to overdrive the nails and remove any improperly installed ones.
Alternatives
Using Sealant as a long-term solution for your room is not recommended. However, if you need a temporary fix, you can use Sealant in the nailing line of Shingles, allowing some time to dry properly. Another alternative would be to use large stapler pins, which may not withstand strong winds.
Conclusion
Installing 3-tab shingles is not difficult, but it requires attention to detail and the right tools. By following the steps & tips outlined in this article, you can ensure that your shingles are installed correctly and will last many years. With the proper knowledge and tools, you can install your roof in no time.
If you found this article helpful, please share it with your friends and family on social media! Also, leave a comment to let us know what you think about the article. We always appreciate your feedback and would love to hear your thoughts. Thank you for reading!
FAQ’s
What Type of Nails Should Be Used on 3 Tab Shingles?
Galvanized (zinc-coated) roofing nails are the best type of nails to use on 3 Tab Shingles. Stainless steel nails can also be used, but they tend to be more expensive than galvanized nails.
What Size Are Nails Used for 3 Tab Shingles?
For most roofing jobs, nails measuring a minimum 12-gauge shank and a 3/8-inch diameter head & length 1‐inch should suffice. If the nails protrude more than 1/8 inches from the bottom of the wood or board, however, it is recommended to use a smaller size nail.
Is It Ok to Nail Into Shingles?
Nails are essential for securely attaching 3-tab shingles, as they are the only thing that will hold them in place for many years.
What Kind of Nail Gun for Shingles?
Pneumatic nail guns are the most popular tool for installing 3-tab shingles. They are powered by an air compressor and use nails for securely attaching the shingles to the roof.
What Are the Signs of Improper Shingle Nailing?
Signs of incorrectly installed shingles include:
1. Nails that are not positioned at a 90-degree angle.
2. Nails that are not flush with the shingles.
3. Nails that have been driven too deeply.
4. Shingles are a little shifting.
Read Also – How to Fix Brad Nails Sticking Out
