Putting a lag bolt into wood may seem challenging, but with the right tools and techniques, it becomes a straightforward task. This guide provides detailed instructions, safety tips, and troubleshooting advice to ensure success.

What is a Lag Bolt?
A lag bolt, also known as a lag screw, is a heavy-duty fastener designed to provide strong and secure connections. It is commonly used for:
- Securing structural components
- Attaching heavy furniture
- Building decks and outdoor structures
- Industrial and construction applications
Tools and Materials Needed
Before you begin, gather the following tools and materials:
- Lag bolts (various sizes as needed)
- Drill (corded or cordless)
- Two drill bits (one for the pilot hole, one for the clearance hole)
- Ratchet and socket set (for tightening)
- Measuring tape (for accurate placement)
- Pencil or marker (for marking drill points)
- Safety goggles (eye protection)
- Gloves (to protect hands from splinters)
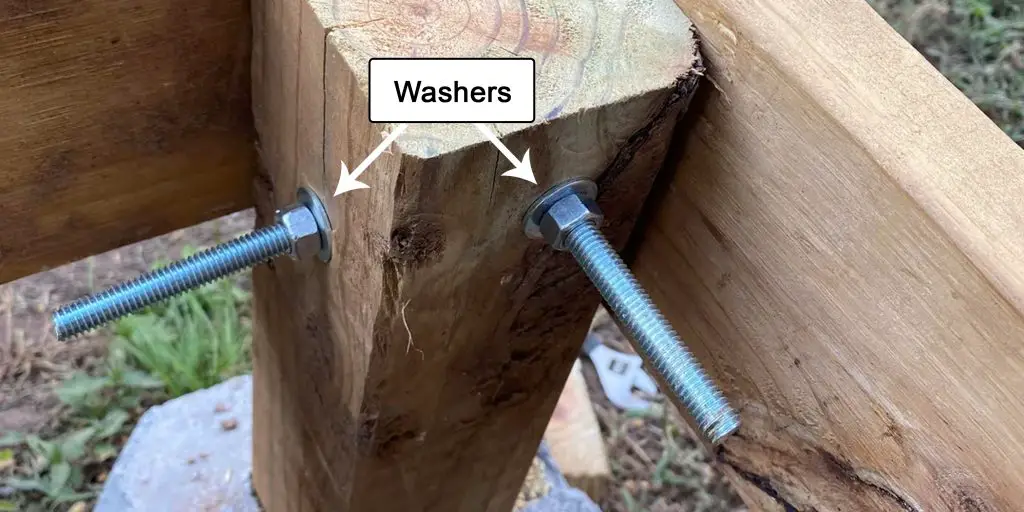
- Washers (to distribute load and prevent damage)
- Lubricant (for easier insertion into hardwoods)
Step-by-Step Installation
Step 1: Measure and Mark
The first step is to measure the exact placement of the lag bolt. Use the measuring tape to determine where the bolt should go, and mark the spot with a pencil. Accurate placement ensures a strong connection.
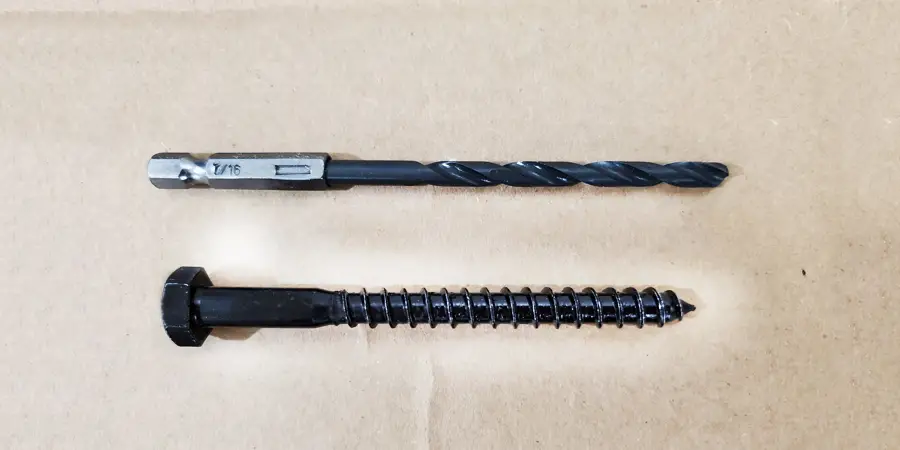
Step 2: Choose the Right Drill Bits
You need two drill bits:
- One should be 1/16 inch smaller than the lag bolt shaft for the pilot hole.
- The other should match the bolt diameter for the clearance hole.
Step 3: Drill the Holes
- Put on safety goggles before drilling.
- First, drill a clearance hole through any top material being fastened.
- Then, drill a pilot hole in the receiving wood, making it about 75% of the bolt’s length.
- If working with dense hardwood, consider using a lubricant.
Step 4: Insert the Lag Bolt
- Place a washer on the lag bolt.
- Insert the bolt through the clearance hole into the pilot hole.
- Use a ratchet and socket to turn the bolt clockwise.
- Continue tightening until the bolt is snug, but avoid overtightening.
Technical Details
- Torque Specifications: Follow manufacturer recommendations for proper torque levels.
- Weight Capacity: Lag bolts can support 100-300 lbs depending on size and wood type.
- Load Distribution: When using multiple bolts, distribute them evenly to prevent strain on the wood.
Safety Precautions
- Eye Protection: Always wear safety goggles to prevent debris from entering your eyes.
- Lifting Techniques: Use proper lifting posture when handling heavy wood pieces.
- Power Tool Safety: Ensure the drill is turned off when changing bits.
- Ventilation: When working in enclosed spaces, maintain airflow to avoid inhaling dust.
Wood Considerations
- Wood Types:
- Softwood (Pine, Cedar): Easier to drill; requires less pilot hole depth.
- Hardwood (Oak, Maple, Mahogany): Denser; pre-drilling and lubrication recommended.
- Grain Direction: Align bolts with the grain for maximum hold.
- Moisture Content: Damp wood can expand and loosen bolts over time.
- Pre-Treatment: Use wood sealant for added longevity in outdoor conditions.
Tool-Specific Information
Drill Speed: Use medium speed for better control.
Socket Size Guide:
- 1/4″ bolt → 7/16″ socket
- 3/8″ bolt → 9/16″ socket
- 1/2″ bolt → 3/4″ socket
Impact Driver vs Ratchet:
- Impact drivers provide faster and easier tightening.
- Ratchets allow for manual control to prevent overtightening.
Tool Maintenance:
- Keep drill bits sharp to avoid splintering.
- Regularly lubricate moving parts of the ratchet.
Advanced Applications
- Multiple Lag Bolt Patterns: Use staggered patterns for enhanced stability.
- Structural vs Decorative Use: Lag bolts are best for load-bearing applications.
- Weather Resistance: Use galvanized or stainless steel bolts for outdoor projects.
Troubleshooting
Sometimes, issues may arise during installation. For example:
- If the wood splits, try using a larger pilot hole and adding a washer to distribute the load.
- If a bolt gets stuck, apply lubricant around the threads and try backing it out slowly using a ratchet. If that doesn’t work, a bolt extractor can help.
- If a bolt becomes loose over time, you can fill the hole with wood filler and re-drill to restore a tight fit.
Frequently Asked Questions
Why Do I Need Two Different Holes?
The clearance hole allows the bolt to pass freely through the top material, ensuring the bolt head pulls the pieces together. The pilot hole helps guide the bolt and prevents splitting in the receiving wood.
Do I Always Need Washers?
Yes. Washers help distribute the load and prevent the bolt head from sinking into the wood, reducing damage and improving durability.
How Do I Prepare the Wood for a Lag Bolt?
To prevent splitting, drill a pilot hole before inserting the lag bolt. If the wood is dense, use a lubricant to ease installation.
Conclusion
Installing a lag bolt correctly ensures a strong and durable connection. By following these steps, using the right tools, and considering safety precautions, your project will be secure and long-lasting. Happy building!
If you found this guide helpful, share it with your friends and family! Have any suggestions or questions? Drop a comment below!
Read more about Lag Bolt: How Does a Lag Shield Work