Stripped or destroyed lug nuts can cause trouble when changing tires or doing wheel work. This guide explains why lug nuts fail, how to remove damaged ones safely, and how to prevent future problems. It covers tools, safety tips, troubleshooting, and when to get professional help.
What Causes Lug Nuts to Be Destroyed?
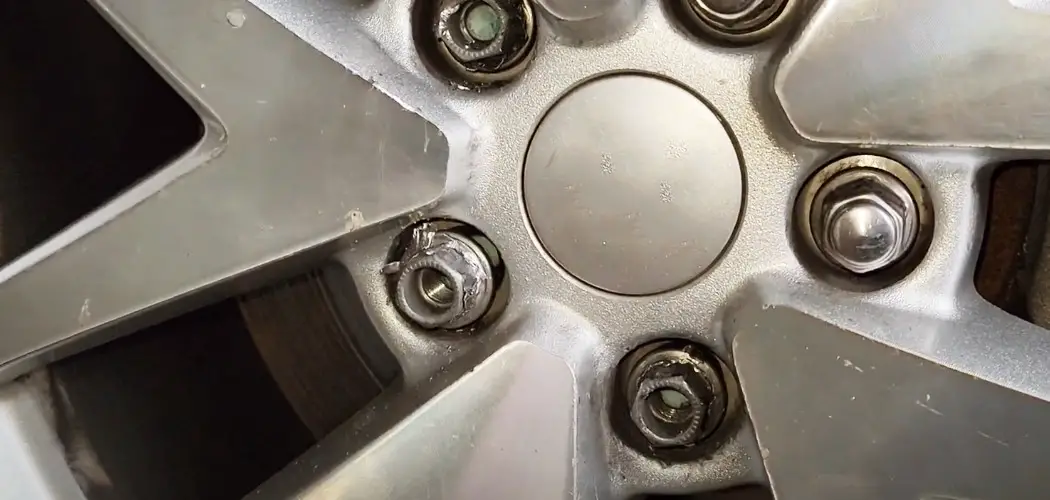
Lug nuts get damaged for several reasons:
- Rust and Corrosion: Exposure to water, salt, and dirt causes rust. Rust weakens nuts and makes removal harder.
- Over-tightening: Applying too much torque strips the nut’s edges.
- Low-Quality Nuts: Cheap replacements wear out faster.
- Wear and Tear: Frequent loosening and tightening round off corners.
- Wrong Tools: Using incorrect sizes or poor-quality tools damages nuts.
Safety First: Protect Yourself and Your Vehicle
Before working on lug nuts, follow these safety steps:
- Secure the Vehicle: Engage the parking brake and place wheel chocks on opposite wheels.
- Use a Proper Jack: Always use a reliable jack on recommended lift points.
- Wear Protective Gear: Use safety glasses and gloves to protect your eyes and hands.
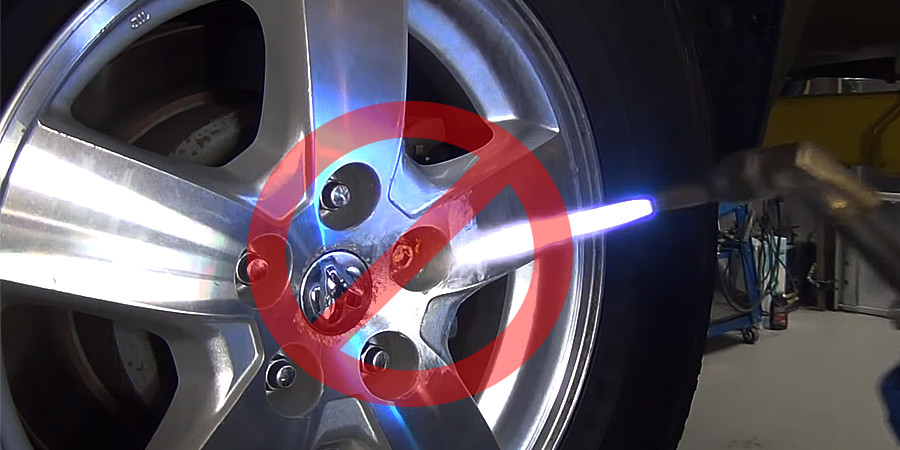
- Be Careful of Heat: Friction from forcing sockets or extractors can cause heat. Avoid burns by allowing tools to cool.
- Avoid Stud Damage: Aggressive removal can snap wheel studs, which is costly to repair.
- Know Your Limits: If unsure or lacking tools, seek professional help instead of risking injury or damage.
Tools and Equipment: What You Need
Essential Tools
- Penetrating Oil: WD-40, PB Blaster, or similar. Helps loosen rusted nuts.
- Impact Socket (6-Point Recommended): Use a socket slightly smaller than the damaged nut to grip rounded edges. This means selecting a 6-point socket designed to bite into the lug nut surface, not a completely wrong size.
- Lug Nut Extractor: Special tool made for stripped nuts.
- Torque Wrench: For proper tightening after removal.
Tool Recommendations
- Quality matters more than brand. Reliable brands include DeWalt, Milwaukee, and GearWrench. For budget options, brands like Tekton or EPAuto offer decent tools.
- Torque wrenches come in various ranges. Check your vehicle’s manual for the exact torque needed rather than assuming a generic range.
How to Remove a Destroyed Lug Nut
Follow these steps carefully:
- Apply Penetrating Oil : Spray the nut liberally. For light rust, wait 10-15 minutes. For heavy rust, soak for several hours or overnight. Severely corroded nuts may require repeated oil applications over several days.
- Use a 6-Point Impact Socket : Choose a 6-point socket slightly smaller than the nut to grip rounded edges. Fit it by hand or tap gently with a hammer. Use a breaker bar or large ratchet to turn it off steadily. Avoid quick or jerky motions.
- Use a Lug Nut Extractor: If the socket slips, switch to a lug nut extractor. Fit it firmly, then use a breaker bar or impact wrench carefully.

- Be Cautious with Impact Wrenches: Impact wrenches can damage damaged nuts by spinning them without grip. Use them only if you know how to control torque and avoid further damage.
- Seek Professional Help if Needed: If nuts remain stuck after these steps, or if studs look damaged, consult a professional.
Troubleshooting and Advanced Techniques
- Extractor Failure: Don’t apply excessive force; this can snap wheel studs.
- Seized Studs or Damaged Threads: Rust can seize studs or damage threads. Use a thread repair kit (e.g., Helicoil) if threads are damaged.
- Emergency Roadside Tips: Carry penetrating oil and a portable impact wrench if possible. Call roadside assistance if stuck.
- Cost Considerations: DIY saves money but risks damage. Professional removal typically costs $50-$150 depending on difficulty.
Prevention Strategies: Keep Lug Nuts in Good Shape
- Torque Correctly: Use a torque wrench and follow your vehicle’s exact torque specs. Passenger cars usually require 80-100 ft-lbs, while trucks and SUVs may need more. Never guess or exceed recommendations.
- Regular Maintenance: Check lug nuts during tire rotations or every 5,000-7,000 miles. In harsh climates or heavy use, check more often.
- Seasonal Care: Clean lug nuts after winter to remove salt and debris. Apply anti-seize compound sparingly on studs unless your vehicle manufacturer advises against it—some warn anti-seize can cause over-tightening.
- Use Quality Parts: Replace lug nuts only with OEM or high-quality equivalents.
- Avoid Over-tightening: Never rely on air guns for final torque.
Vehicle-Specific Guidance
- Steel vs. Aluminum Wheels: Aluminum rims scratch easily. Use protective covers when working on them.
- Luxury or Specialty Vehicles: Locking lug nuts or special sizes require correct tools and procedures. Check the manual.
- Lug Nut Types: Acorn, flat, and extended nuts need matching socket types.
When to Call a Professional
- If you lack proper tools or confidence.
- Nuts or studs are severely rusted or damaged.
- Wheels have cosmetic damage.
- Your vehicle uses locking lug nuts without a key.
- Repair costs are justified to avoid greater damage.
Look for qualified tire shops or mechanics with good reviews.
After Removal: Repair and Replacement
- Inspect studs and rims for damage.
- Use thread repair kits if threads are damaged.
- Replace damaged lug nuts with correct types and sizes.
- Apply anti-seize compound carefully, following vehicle guidelines.
- Tighten lug nuts with a torque wrench according to specs.
Summary
Removing destroyed lug nuts needs patience, the right tools, and safety measures. Use penetrating oil, the correct sockets, and extractors carefully. Follow your vehicle’s torque specs and maintain your lug nuts regularly. Avoid risky shortcuts that damage studs or wheels. When unsure, hire a professional.