Butterfly anchors are widely used fasteners designed to hold items securely on hollow walls, drywall, plaster, and thick boards. They have wing-like parts that expand behind the wall surface to provide a strong grip. Although butterfly anchors offer reliable support, there are times when you need to remove them safely and efficiently.
This guide will walk you through everything you need to know about butterfly anchors, including types, accurate weight capacities, safety precautions, removal methods, troubleshooting, wall repair, and prevention tips.
What Are Butterfly Anchors?
Understanding the different types of anchors is essential before attempting removal.
True Butterfly Anchors (Metal Toggle Bolts)
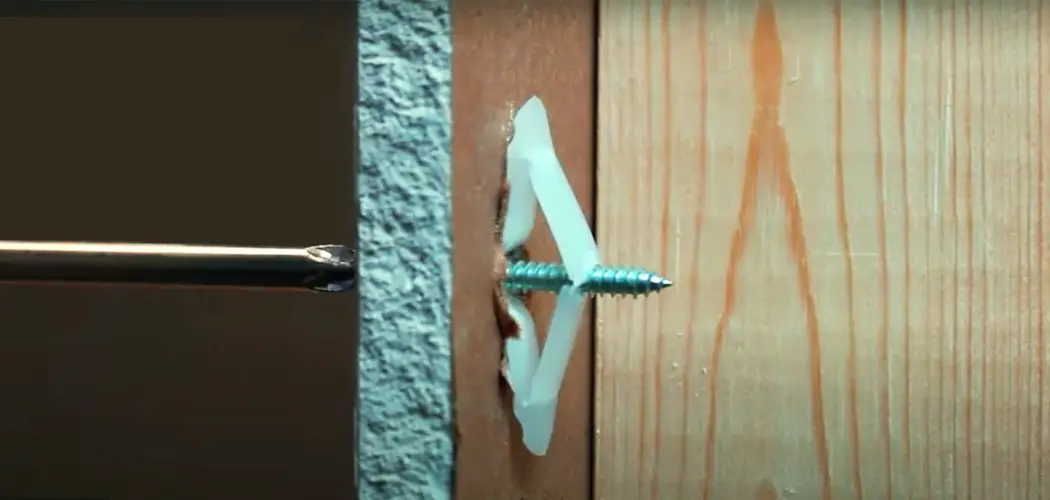
The term butterfly anchor traditionally refers to metal toggle bolts. These have two spring-loaded wings that fold to pass through a drilled hole, then open behind the wall to hold the fastener firmly. This design allows them to carry heavier loads compared to basic anchors.
Plastic “Butterfly-Style” Anchors
Some plastic anchors are called butterfly-style because of their wing shape, but they operate differently. These plastic expansion anchors rely on expanding within the drywall cavity, not spring-loaded wings. Their load-bearing capacity is lower, and removal techniques vary from metal toggle bolts.
Accurate Weight Capacity Information
Weight limits for anchors depend on several factors: material, size, installation quality, and wall thickness. Here are updated, reliable weight ranges:
| Anchor Type | Typical Load Capacity | Notes |
|---|---|---|
| Basic plastic anchors | 10 to 25 pounds | Lightweight anchors for small fixtures |
| Heavy-duty plastic anchors | 25 to 50 pounds | Larger or reinforced plastic anchors |
| Metal toggle bolts | 50 to 150+ pounds | Depends on bolt diameter and wall thickness |
The Role of Wall Thickness
Wall thickness greatly influences anchor strength. For example:
- A 1/8-inch diameter metal toggle can hold about 30 pounds on 1/2-inch drywall.
- A 3/8-inch toggle bolt can support 50 pounds or more on the same drywall thickness.
Always check the manufacturer’s packaging for exact weight ratings and follow recommended installation instructions to ensure safety.
Why Remove Butterfly Anchors?
There are several reasons you may need to remove butterfly anchors:
- The anchor is loose, damaged, or no longer holds properly.
- You want to relocate or replace the mounted item.
- You plan to switch to a different fastener type better suited to your needs.
- The wall requires repair or repainting after removing fixtures.
- The anchor was incorrectly installed, compromising its holding strength.
Knowing why you need removal can help you select the best method and tools.
Safety First: Precautions to Follow
Safety is critical when working with wall anchors. Follow these precautions:
- Wear safety glasses to protect your eyes from flying debris and dust, especially during drilling or hammering.
- Use a stud finder or wire detector to check for electrical wiring, plumbing, or pipes behind the wall before beginning. Accidental contact can cause injury or costly repairs.
- Ensure adequate ventilation when drilling, particularly in confined spaces, to avoid inhaling drywall dust. Consider wearing a dust mask if needed.
- Handle all tools carefully to avoid injury and accidental wall damage.
- If unsure about any aspect of removal—especially near electrical or plumbing systems—consult a professional.
Tools Required for Removing Butterfly Anchors
Having the right tools ready will make the removal process easier and safer. Gather:
- Safety glasses
- Electric drill with appropriate bits (masonry or standard bits depending on wall type)
- Pliers (needle-nose and regular)
- Utility knife or sharp knife
- Hammer
- Crowbar or pry bar
- Wood block (to protect the wall when levering)
- Wall filler or putty for repairing holes
- Sandpaper for smoothing repairs
- Screw extractor (optional) for damaged or broken screws
Different Wall Types and How They Affect Removal
Knowing your wall type will help choose the safest removal approach.
- Drywall: Common in many homes, drywall is hollow behind the surface and repairs are relatively simple. Butterfly anchors work well here.
- Plaster walls: Older homes may have plaster walls, which are thicker and more brittle than drywall. Removal requires extra care to prevent cracking or crumbling.
- Concrete or masonry: These solid materials require special anchors (like sleeve anchors) and tools; butterfly anchors are typically not used. Removal methods differ greatly.
- Wall thickness: Thicker walls can support heavier loads. Match anchor type and size accordingly.
Step-by-Step Methods to Remove Butterfly Anchors
Method 1: Drill Through the Anchor
Ideal for plastic anchors stuck in the wall cavity.
- Fully unscrew and remove the screw or bolt.
- Carefully cut off the flush face of the anchor with a utility knife to avoid damaging surrounding wall.
- Use a drill to bore into the anchor and push it out behind the wall.
- Clean any remaining debris.
Difficulty: Intermediate
Estimated time: 5 to 10 minutes per anchor
Method 2: Pull with Pliers or Crowbar
Works best for metal toggle bolts with sturdy wings.
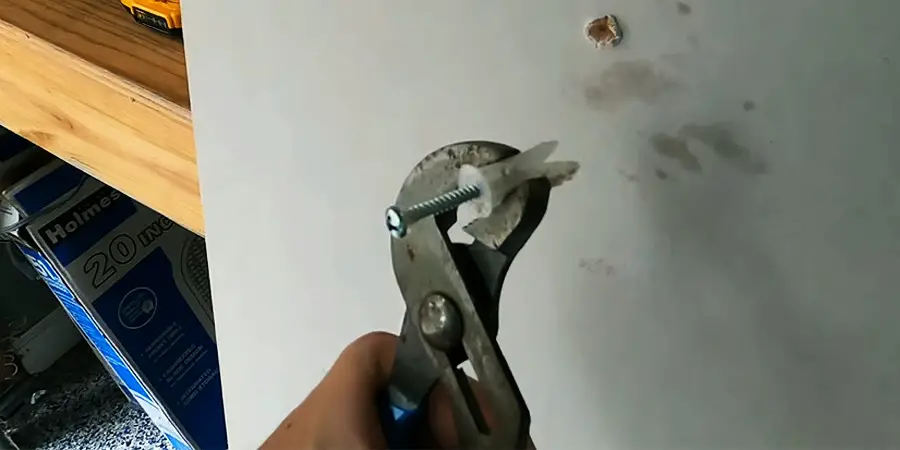
- Insert the bolt about one-third into the anchor to get a solid grip.
- se needle-nose pliers to grasp the bolt or a crowbar for leverage.
- Place a wood block against the wall to prevent damage when levering.
- Pull or pry gently to remove the anchor.
Difficulty: Beginner to intermediate
Estimated time: About 5 minutes per anchor
Method 3: Hammer It Out
Useful for stubborn plastic anchors that resist pulling.
- Use a utility knife to cut the plastic face flush with the wall.
- Unscrew the bolt partially, about one-third in length.
- Tap the bolt head lightly with a hammer to push the anchor through the hollow wall cavity.
If the anchor falls behind the wall, it generally will not cause any issues.
Difficulty: Beginner
Estimated time: 5 to 8 minutes per anchor
Troubleshooting Common Problems
- Anchor spins freely: This usually means the wings are not gripping the drywall. Try drilling out the anchor or pulling with pliers after loosening the screw.
- Broken or stripped screws: Use a screw extractor to remove damaged screws before attempting anchor removal.
- Anchor won’t budge: Lightly tapping the anchor head can help collapse the wings, making removal easier.
- Anchor stuck deep inside wall: If the anchor cannot be removed without damaging the wall, consider patching over it instead.
How to Repair the Wall After Anchor Removal
Removing anchors leaves holes that must be fixed for a clean finish.

- Clear dust and debris from the hole using a brush or vacuum.
- Apply a wall filler or putty using a putty knife, filling the hole completely.
- Allow the filler to dry fully—follow manufacturer drying times.
- Sand the patched area with fine sandpaper until smooth and flush with the wall.
- Apply a primer over the patch before repainting to ensure even color and adhesion.
- Paint the repaired area to match your wall.
For plaster walls, use plaster-specific repair products for best results.
Preventing Future Removal Difficulties
- Always use anchors suited to the wall type and load requirements.
- Follow manufacturer instructions carefully during installation.
- Avoid over-tightening screws, which can damage the wall or anchor.
- Mark anchor locations lightly on the wall surface for future reference or removal.
- Consider alternative fasteners if you anticipate frequent removal or repositioning.
When Not to Remove Butterfly Anchors
- If the wall material is fragile or brittle (such as aged plaster), removal may cause more harm than leaving the anchor in place.
- For large or heavy fixtures, consult a professional before removal to avoid structural damage.
- If anchors are embedded too deeply or tightly and removal risks creating large holes, consider patching over the anchor.
Cost and Time Considerations
- DIY removal is low-cost, typically only requiring basic tools and materials you may already own.
- Each anchor removal generally takes 5–15 minutes, depending on wall type and anchor condition.
- Professional services may be necessary for extensive repairs, complicated wall structures, or when electrical/plumbing risks exist.
- Repair materials such as filler, primer, and paint are inexpensive and widely available.
Summary and Final Advice
Removing butterfly anchors is manageable with the right knowledge, tools, and safety precautions. Correctly identifying the type of anchor, understanding weight capacities, and choosing the proper removal method ensures minimal wall damage and safe results. Always wear safety gear, check for hidden wiring or plumbing, and repair holes neatly after removal to keep your walls looking their best.
If you found this guide helpful, please share it with others who might benefit. Feel free to leave comments or questions below — your feedback helps everyone improve their DIY skills!
Read More – The Most Effective Ways to Remove Wall Plug