Removing old deck screws can be a satisfying task, but it is often time-consuming. This article provides a detailed explanation of the steps involved to make the process easier. Following these steps, you can make removing old deck screws much less tedious. So, Let’s start-
Reasons for Removing Old Deck Screws
If you’re a homeowner with a deck, you’re probably aware of the importance of maintaining it to ensure its safety and longevity. One common issue that deck owners face is the need to remove old deck screws. Here are some reasons why removing old deck screws is necessary:
Maintaining the Deck’s Value
A well-maintained deck is an essential investment in your home’s value. By removing old screws and making necessary repairs, you can help ensure that your deck continues to provide a safe and attractive outdoor space for years to come.
Safety Concerns
Over time, screws can loosen or corrode, which can lead to instability and safety hazards. Loose screws can cause boards to shift or even collapse, which can be dangerous for anyone on or near the deck. Additionally, corroded screws can weaken the structure of the deck, making it more vulnerable to collapse or other damage.
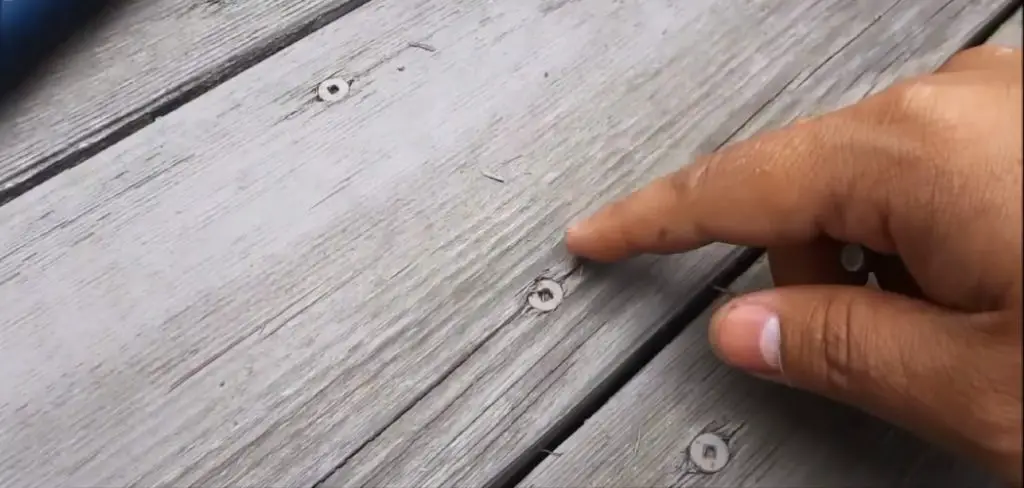
What Condition Can Old Deck Screws Be?
Old deck screws can be in a variety of conditions depending on how long they’ve been in use, the type of wood they’re screwed into, and the type of climate they’re exposed to. Here are some possible conditions old deck screws can be in:
Rusted
Over time, metal screws can become rusty due to exposure to moisture or humidity. Rusty screws can be difficult to remove and may need to be cut or drilled out.
Corroded
If old deck screws are made from low-quality metal or are not coated to protect against corrosion, they can become corroded and weakened over time. Corroded screws can break or snap off during removal, making the process more difficult and potentially damaging the wood around the screw.
Stripped
When screws are repeatedly turned in, and out of wood, they can become stripped, meaning the threads no longer grip the wood properly. Stripped screws can be difficult to remove, as a screwdriver or drill bit may not be able to gain purchase.
Broken
In some cases, old deck screws can break off completely, leaving a portion of the screw embedded in the wood. Broken screws can be difficult to remove and may require drilling or cutting.
Loose
Over time, screws can become loose due to wood shrinkage or expansion caused by changes in temperature or humidity. Loose screws can be a safety hazard and cause the deck boards to shift or become unstable.
Safety Precautions
It’s essential to take proper safety precautions when removing old deck screws.
Before starting work on your deck, you must equip yourself with the proper safety gear, including glasses, gloves, and shoes. For extra protection, put on some earplugs if you’re using power tools.
Inspect the area thoroughly to avoid any potential hazards, such as loose or rotten boards. Don’t rush the job while removing the old deck screws, as this can increase the risk of an accident or injury. Take your time and focus on doing the task safely.
Methods to Remove Old Deck Screws
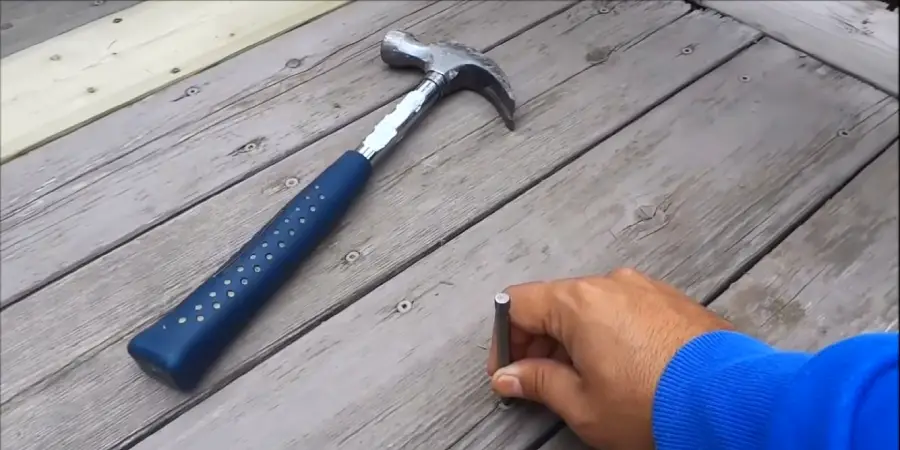
Method 1 – Try the Basic Method:
- Place a screwdriver onto the screw and tap it with a hammer to remove any rust that has built up.
- Afterward, spray WD40 or any other penetrating oil onto the screw and wait a few minutes.
- Finally, use the screwdriver or drill in reverse to loosen the screw. If the screw is not too corroded, it should come off without much difficulty.
Method 2 – Use a Damaged screw extractor
If you hire a professional, they will likely use this extractor to remove screws, which is a prevalent method. Let’s observe how the process works.
- Spray some WD40 on the screw and wait a while to let it take effect.
- A center punch should be used to create a grip on the rusted head of the screw. Place the point of the center punch in the center of the screw and tap it with a hammer to create a deep dent. This will create a hole that provides the necessary grip.
- Using a drill bit corresponding to the extractor’s size, make a small hole in the head of the screw. Follow the chart for guidance.
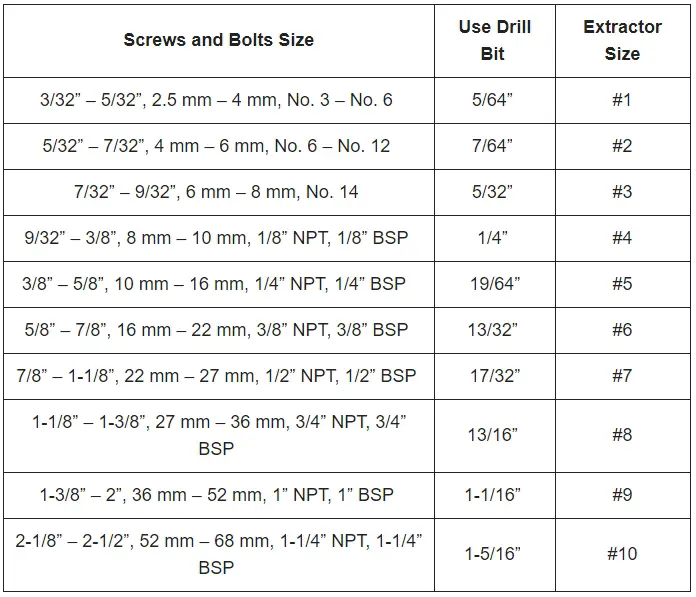
- Insert the spiral screw extractor into your drill, and rotate it in a counterclockwise direction. This will allow it to grip the screw and extract it from the deck.
- After placing the spiral screw extractor on the screw, use a wrench or pliers to turn it in a clockwise motion to loosen the screw. Done!
Method 3 – Use Screw Friction Gel
If the condition of the screw is satisfactory, then one can use Screw Friction Gel, although this is not commonly seen. This is a simple solution that can help you to remove old deck screws without any special tools.
Start by spraying the screw with WD40 or another penetrating oil and let it sit for a few minutes.
Next, apply a friction gel to the screw head to create a grip surface. This will give you a better grip and make it easier to unscrew the screw.
Finally, use a screwdriver or drill to turn the screw in a counterclockwise motion to loosen it and remove it from the deck.
Taking Apart the Deck Without Unscrewing
Method 1 – Cut the Head of the screw
This method is best used when the screws are too corroded or damaged to be unscrewed.
Oscillating saws are great tools that can help you quickly cut through nails and screws. Start by using the saw to cut the head of the screw from the decking plank.
Once the head of the screw has been cut off, insert a crowbar underneath the plank to lift it. This will allow you to remove the plank without unscrewing the screw.
Method 2 – Wood Plug Cutter
I would recommend using something other than this method, as it could cause large holes in your deck. If this isn’t a problem, then you can use the following steps:
- Set the Wood Plug Cutter bit with the drill, and select a size slightly larger than the screw head size.
- Place the drill bit on the top point of the screw and start drilling. Continue drilling until the end of the deck is reached.
- Then, the deck wood should come out when pulled up.
- Use a crowbar/Pry Bar to remove the rest of the screw.
How to Remove Deck Screws Filled With Paint or Burnish?
When a deck screw is filled with paint or burnish, it can be difficult to remove using the primary method. In this case, a screw extractor is the best way to go. This is a tool that is designed to grip the head of a screw and extract it from the deck with minimal effort. (The process of the method has already been given above in this article.)
Avoid to Do
When removing old deck screws, there are a few things to avoid to prevent damage to your deck or injury to yourself:
Using the Wrong Tool
Using the wrong tool can damage the screw head or strip the screw, making it more difficult to remove. Make sure to use the correct tools for the job to avoid any potential damage.
Don’t Apply Heat
Applying heat to old deck screws can also damage the surrounding wood. Heat can cause the wood to dry out, crack, or warp, which can compromise the structure of your deck.
Will Vinegar Loosen an Old Deck Screw?
Vinegar is not an effective solution for loosening old deck screws. While vinegar may help dissolve rust, it is not strong enough to loosen a stuck or corroded screw.
Instead, you can use penetrating oil or a rust dissolver designed for loosening stuck screws. Apply the oil or rust dissolver to the screw, let it sit for a while as directed on the product label, and then try turning the screw with a screwdriver or drill.
Conclusion
In conclusion, removing old deck screws can be challenging, but with the right tools, techniques, and precautions, it can be done safely and successfully.
If you found this article helpful, please share it with your friends who may also be tackling a similar project. And feel free to leave a comment below with any additional tips or techniques that have worked for you previously. Thanks for reading!
Read More-