Rivets are strong, durable fasteners often used in furniture, cabinetry, and wood-metal connections. While reliable, they can be difficult to remove if you’re repairing or modifying a structure.
This guide walks you through five proven rivet removal methods and covers critical safety tips, accurate drilling techniques, troubleshooting, and tool advice to make the job smoother, cleaner, and safer.
Types of Rivets Commonly Found in Woodwork
1. Pop Rivets (Blind Rivets)
Pop rivets are made of a rivet body and a mandrel. These are commonly used in furniture, cabinetry, and lightweight paneling where one-sided access is needed. The mandrel is pulled during installation, expanding the body and then snapping off, leaving only the rivet body in the material.
2. Groove Rivets
Groove rivets feature annular grooves on the shaft. They are designed to expand radially inside a drilled hole, especially in soft materials like wood or plastic. They’re ideal for fastening hard materials (e.g., metal or fiberglass) to wood in blind-hole applications.
Contrary to some misconceptions, groove rivets do not expand into the grain; instead, they mechanically lock into the walls of the drilled hole.
Clarifying Key Terms (Glossary)
| Term | Correct Definition |
|---|---|
| Mandrel | A thin metal pin inside a pop rivet. It pulls the body tight during installation and then snaps off. It does not remain part of the joint. |
| Rivet Body (Shaft) | The main cylindrical part of the rivet that remains embedded in the wood after installation. This is what must be drilled, punched, or chiseled during removal. |
| Rivet Head | The visible flat or domed portion that sits on the wood surface. It provides structural support and aesthetic finish. |
Five Methods to Remove Rivets from Wood
Each method is suited to different rivet types, wood conditions, and available tools.
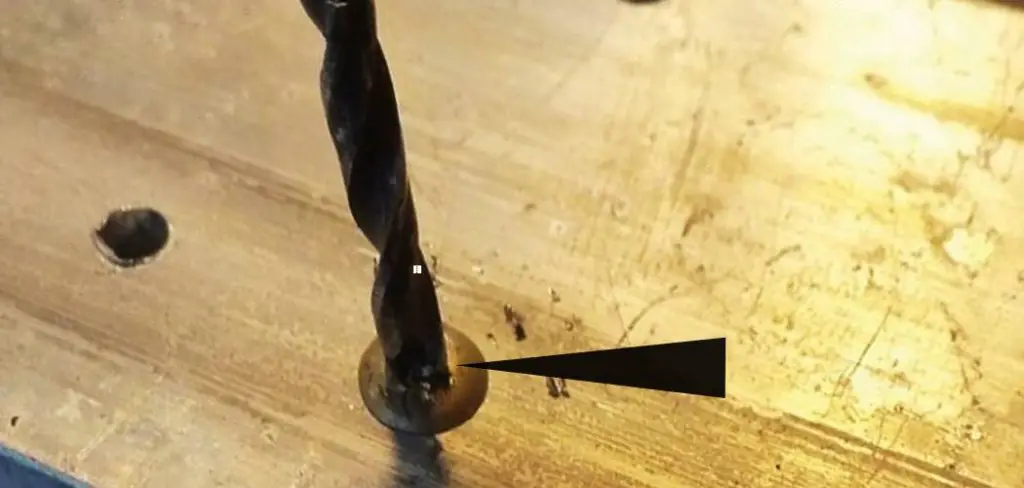
1. Drill Method (Most Common)
Best for: Standard aluminum or steel rivets in furniture, plywood, and medium-density fiberboard (MDF).
Steps:
- Use a center punch to mark the center of the rivet head. This prevents drill wandering.
- Select a drill bit slightly larger than the rivet body (shaft). Do not use the mandrel diameter for reference.
- For a 1/8″ rivet, use a 5/32″ or 11/64″ HSS bit.
- For a 3/16″ rivet, use a 13/64″ or 7/32″ bit.
- Drill slowly through the rivet head until it detaches from the shaft.
- Remove the exposed shaft with pliers or tap it through the wood using a punch.
Drill Tip: Use HSS or cobalt bits for metal, and keep speed moderate to prevent overheating.
2. Chisel Method (Best for Preserving Wood Surface)
Best for: Hardwood trim, decorative furniture, and antique woodwork where minimal damage is important.
Steps:
- Place a sharp chisel at the rivet head’s edge. Score lightly around the perimeter.
- Tap gently with a hammer to wedge the chisel under the head.
- Continue tapping and levering around the head until it pops off cleanly.
- Push the remaining shaft through the hole using a nail, screwdriver, or punch.
Preservation Tip: Always work along the wood grain to reduce risk of chipping or splitting.
3. Punch and Hammer Method
Best for: Rivets with exposed or broken heads, or when drilling is impractical.
Steps:
- Use a metal punch and align it with the center of the rivet shaft.
- Strike firmly with a hammer to push the shaft through the wood.
- Repeat as needed or switch to pliers if the shaft becomes exposed.
This method works best for pop rivets where the mandrel has already detached, and the shaft is partially loose.
4. Rivet Puller Tools
Best for: Frequent rivet removal or professional workshops.
Tool Types:
- Manual rivet pullers
- Pneumatic rivet guns with reverse function
- Specialty extraction pliers
These tools grip under the rivet head and pull the body upward or outward, separating the rivet cleanly from the surface.
Efficiency Tip: These tools are ideal for repetitive tasks or sensitive surfaces like veneer panels.
5. Grinder Method
Best for: Large-diameter rivets, flush-mounted rivets, or stubborn rivets that resist drilling.
Tools Required:
- Angle grinder with a thin metal cutoff disc
- Flat file or sandpaper for smoothing after removal
Steps:
- Wear full protective gear (goggles, gloves, ear protection).
- Grind off the rivet head until flush with the wood.
- Use a punch to tap the shaft through.
- Sand or file the surface if needed.
Warning: Use with care. Sparks, heat, and surface damage are risks.
Expanded Safety Guidelines
Required Personal Protection:
- Safety glasses or goggles: Block wood dust and flying metal shards.
- Dust mask or respirator: Prevents inhalation of fine particles during drilling or grinding.
- Work gloves: Protect against sharp edges and splinters.
- Ear protection: Required for grinders or hammering.
Safe Work Area Setup:
- Clamp the wood securely.
- Keep flammable materials away if using heat or grinders.
- Maintain clean tool surroundings to prevent accidents.
Tool Handling Tips:
- Inspect tools before use.
- Use sharp bits and blades only.
- Follow manufacturer guidelines for all equipment.
Wood-Specific Considerations
| Wood Type | Preferred Method | Notes |
|---|---|---|
| Softwood (pine, fir) | Drill, punch | Use painter’s tape to reduce tear-out. Go slow to prevent splintering. |
| Hardwood (oak, maple) | Drill, chisel | Pre-drill accurately. Tap lightly when using chisel. |
| Plywood | Drill | Drill perpendicular to reduce delamination. |
| Veneered/MDF panels | Chisel or puller | Avoid heat or heavy vibration tools. |
Grain Direction Note: Always drill or chisel along the grain when possible to preserve structural integrity.
Tool Selection Guide
| Tool | Purpose | Tips |
|---|---|---|
| Drill + HSS Bit | Removing rivet head | Match bit to shaft diameter, not mandrel. |
| Chisel + Hammer | Preserving surface | Keep chisel sharp; tap lightly. |
| Center Punch | Precise drill start | Helps prevent slipping. |
| Rivet Puller | Clean and fast removal | Ideal for bulk work. |
| Grinder | Cutting rivet heads | Use only on heat-resistant, hidden surfaces. |
| Pliers/Wrench | Final extraction | Works best after head removal. |
Troubleshooting Rivet Removal
| Problem | Likely Cause | Solution |
|---|---|---|
| Rivet won’t drill | Hardened steel or blunt bit | Use cobalt bit or sharpen HSS bit |
| Bit wanders off | No punch used | Use center punch to guide drill |
| Rivet head spins | Shaft not supported | Clamp or press gently with pliers while drilling |
| Wood splits or chips | Aggressive drilling or chiseling | Slow down, tape area, or switch to a smaller bit first |
Post-Removal Hole Repair
Once the rivet is removed, deal with the remaining hole:
- Wood filler: Ideal for small cosmetic patches, especially before painting.
- Wood plugs/dowels: Best for structural integrity or re-drilling.
- Leave open: Acceptable for hidden or non-load-bearing areas.
Guide: Visit our screw hole repair article for techniques and tools.
Alternative Fasteners to Rivets
| Fastener | Use | Pros | Cons |
|---|---|---|---|
| Wood Screws | Adjustable joints | Easy to remove | May loosen over time |
| Bolts + Nuts | High-strength assemblies | Very secure | Needs access to both sides |
| Wood Glue + Clamps | Permanent joints | Seamless finish | Non-removable |
| Specialty Fasteners | Hidden or decorative use | Aesthetic appeal | May require special tools |
DIY vs. Professional Considerations
| Task Type | Recommendation |
|---|---|
| Small furniture repair | DIY with drill/chisel |
| Antique restoration | Professional recommended |
| Mass panel removal | Consider hiring a workshop |
| Hardwood or layered materials | DIY if experienced, else professional |
Cost Breakdown
| Item | Price Range |
|---|---|
| HSS or Cobalt Drill Bits | $10–$30 |
| Chisel Set | $20–$50 |
| Rivet Puller Tool | $25–$100 |
| Angle Grinder | $50–$120 |
| Professional Rivet Removal | $50–$200 per hour |
DIY is economical for occasional tasks. For batch jobs or valuable wood, hiring a pro may save time and prevent costly damage.
Most Common Mistakes
- Drilling the mandrel instead of the rivet shaft.
- Choosing drill bits that are too small, making removal harder.
- Skipping safety gear, risking injury.
- Rushing the job and damaging the wood.
- Using dull or incorrect tools for metal.
Conclusion
Rivet removal doesn’t need to be difficult if you follow accurate steps, use the correct bit size, and take safety seriously. Whether you’re a weekend DIYer or a woodworking professional, understanding how rivets work—and how to remove them properly—can save your project from damage and save you time and money.
Want to share your own method or ask a question? Drop a comment below and join the discussion.
Read also: Different Types of Rivets for Leather and Their Uses