Rivets join leather pieces securely and quickly. They are stronger than stitching and give a clean look. Different rivet types fit different projects and leather thicknesses. This guide helps you choose, size, and install the right rivet for your work.
What Are Leather Rivets?
Leather rivets are fasteners used to join two or more pieces of leather. Each rivet has two main parts: a head and a body (shaft). The head is usually rounded or flat and is already attached to the rivet body. The body passes through holes in leather and is then flattened, expanded, or fastened with a backing cap or washer to hold the leather securely.
Leather rivets come in various sizes, finishes, and styles. You can choose rivets that match your leather color or add decorative flair.
Why Use Rivets Instead of Other Leather Joints?
- Rivets create stronger joints than stitching alone.
- They resist loosening over time, especially under stress.
- Rivets give a clean and professional finish.
- They suit heavy-use items like belts, bags, and straps.
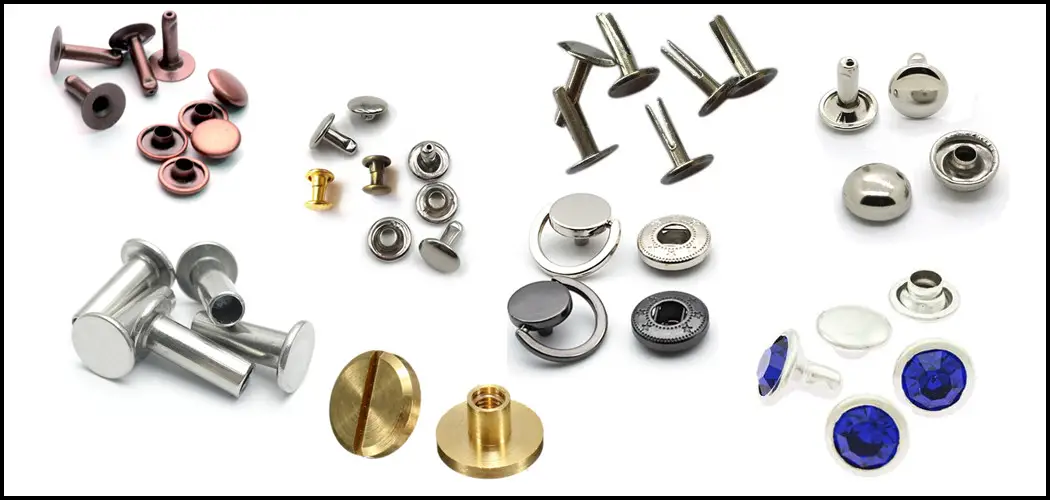
Common Types of Leather Rivets and Their Uses
1. Single Cap Rivets
Single cap rivets have a head on one side and a plain shaft. Use them when only one side will be visible. They are common for wallets, straps, and light-duty items.
2. Double Cap Rivets
Double cap rivets have heads on both sides, with the backing washer or cap attached separately during installation. They provide a balanced, polished look and stronger hold. Good for bags, belts, and harnesses where both sides are visible.
3. Split Rivets
Split rivets have a shaft that splits into two legs when hammered, which bend outward to hold the leather. They are weak in strength and mainly decorative or for very light use on soft leather.
4. Tubular Rivets
Tubular rivets have hollow shafts. The end is flared outward during installation to secure the joint. Types include full tubular, semi-tubular, and compression rivets (note: “compression rivets” sometimes refer to solid rivets in other contexts, so here it means a type of tubular rivet that compresses to hold). These rivets are strong and suit thicker leather.
5. Chicago Screws
Chicago screws are two-part fasteners with a threaded post and a screw cap. They screw together and can be removed easily. Ideal for belts, sheaths, and items requiring disassembly.
6. Chaton Rivets
Chaton rivets have decorative tops with rhinestones or gems. They add style to leather items like collars, handbags, and shoes. Be cautious, as some imported chaton rivets may contain lead, which poses a health risk especially if handled by children or worn against skin.
7. Dome Rivets
Dome rivets have rounded heads, used for decorative purposes and secure joints. They provide a smooth, finished look.
8. Button Rivets
Button rivets have flat, button-like heads. Suitable for clothing and shoes requiring a low-profile fastener.
Sizing and Measurements
Rivet Diameter
Common diameters: 4mm, 6mm, 8mm. Larger diameters provide more strength but require larger holes.
Shaft Length
Choose rivet shaft length based on leather thickness plus allowance for secure fastening:
- Single cap rivets: Leather thickness + 2–3mm
- Double cap rivets: Leather thickness + 3–4mm (allowing space for the backing cap)
- Tubular rivets: Leather thickness + 4–5mm (to allow proper flaring of the hollow end)
Measuring Leather Thickness
Use a leather thickness gauge or calipers. Measure the total thickness where rivet will be set.
Hole Punching Guidelines
- Use a punch slightly smaller than the rivet shaft diameter—about 0.1 to 0.2 mm less—to ensure a tight fit.
- A hole that is too large may cause the rivet to loosen or pull out.
- Punch clean, straight holes to avoid tearing.
Installation Tools and Process
Required Tools
- Hole punch (size slightly smaller than rivet shaft)
- Rivet setter or anvil
- Hammer or mallet (preferably with a plastic or rawhide head to avoid damage)
- Pliers or screwdriver (for Chicago screws)
- Safety glasses (strongly recommended to protect eyes from metal fragments)
Installation Steps
- Mark the rivet location on leather layers.
- Punch a hole using the correct size punch.
- Insert the rivet shaft through the hole; the head is already fixed to one end.
- For double cap rivets, place the backing cap or washer on the exposed shaft end.
- Place the rivet on the anvil or setter base.
- Use the rivet setter and hammer to flatten or flare the shaft end, securing the rivet. For tubular rivets, flare the hollow end properly.
- For Chicago screws, align post and screw, then tighten by hand or with pliers.
Common Mistakes to Avoid
- Using holes too large or too small.
- Hammering on hard surfaces without proper anvil.
- Not wearing safety glasses.
- Using shaft length too short for the leather thickness.
Material Specifications and Strength
Metals Commonly Used
- Brass: corrosion-resistant, good strength, attractive finish
- Copper: softer and decorative but less strong
- Nickel-plated: strong, corrosion-resistant with silver tone
- Steel: very strong but prone to rust without coating
Note: Galvanizing refers specifically to zinc coating for corrosion protection. Nickel plating and other finishes also protect but are not galvanizing.
Strength Ratings
| Rivet Type | Strength | Notes |
|---|---|---|
| Single Cap | Medium | Suitable for light to medium loads |
| Double Cap | High | Strong pull resistance on both sides |
| Split | Low | Mostly decorative; weak hold |
| Tubular | Very High | Best for thick leather and heavy loads |
| Chicago Screw | High | Strong and removable; good for straps |
| Chaton | Low (decorative) | Use mainly for decoration |
| Dome | Medium | Decorative with secure hold |
| Button | Medium | Low profile; moderate strength |
Temperature and Durability Notes
- Rivets generally tolerate normal outdoor temperatures.
- Extreme cold may cause some metals to become brittle.
- Extreme heat affects leather more than rivets; avoid exposing leather to very high temperatures.
- Brass and nickel finishes resist corrosion well; uncoated steel may rust.
Selecting Rivets by Project
Leather Thickness and Weight
Leather weight is often measured in ounces (oz), where 1 oz ≈ 1/64 inch ≈ 0.4 mm thickness.
- Light leather (2-3 oz / 0.8-1.2 mm): Use 4-6 mm rivets.
- Medium leather (4-6 oz / 1.6-2.4 mm): Use 6-8 mm rivets.
- Heavy leather (8-10 oz / 3.2-4 mm+): Use 8 mm+ rivets, preferably tubular or double cap for strength.
Matching Finish
Match rivet finish to leather tone and project style:
- Brass for warm, vintage looks.
- Nickel or silver for cool or modern designs.
- Black or matte finishes for rugged or stealth style.
Cost Overview
- Single cap and split rivets: least expensive.
- Tubular and double cap rivets: mid to high price, higher strength.
- Chaton rivets: typically the most expensive due to decorative stones.
Troubleshooting Rivets
Rivet Pull-Out
- Check if hole is too large or shaft too short.
- Use double cap or tubular rivets for heavy loads.
- Ensure proper installation with correct flaring or flattening.
Removing Rivets
- Drill out rivet carefully using a drill bit slightly larger than shaft diameter.
- Pry gently with pliers if accessible.
- Avoid cutting or tearing leather.
Installation Issues
- Wobbling rivets: repunch hole or use larger rivet.
- Leather wrinkles or damage: use a softer hammer surface and proper hole size.
Project-Specific Recommendations
Rivet Spacing
- Belts: about 1 inch (25 mm) apart for strength and flexibility.
- Bags and handles: 0.5 to 0.75 inch (12-19 mm) spacing for stress points.
- Decorative rivets: even spacing to create clean patterns.
Load-Bearing Areas
Use strong rivets like double cap or tubular on straps, handles, and joints.
Aesthetic Placement
Place rivets symmetrically and along leather grain for neat appearance.
Maintenance and Longevity
Cleaning
- Wipe metal parts with a soft cloth regularly.
- Use metal polish on brass or copper rivets occasionally.
- Avoid harsh chemicals on rivets or leather.
Lifespan
Quality rivets last many years under normal use.
Galvanized or nickel-plated rivets resist rust better outdoors.
Repair vs Replace
Replace rivets that loosen or corrode.
Repair leather holes if torn before reinstalling rivets.
Safety and Quality
- Always wear safety glasses when installing rivets.
- Buy rivets from trusted suppliers to avoid brittle or toxic materials.
- Be cautious with decorative rivets that may contain lead.
- Use the correct tools and technique to avoid injury and damage.
Advanced Tips
- Combine rivets with stitching for extra strength on heavy projects.
- Use chaton or dome rivets to create decorative patterns.
- Use rivet setters and dies designed for specific rivet types for a clean finish.
Comparison Table of Rivet Types
| Rivet Type | Strength | Installation Difficulty | Best Use | Price Range |
|---|---|---|---|---|
| Single Cap | Medium | Easy | Light leather projects | Low |
| Double Cap | High | Moderate | Bags, belts, harnesses | Medium to High |
| Split | Low | Easy | Decorative, soft leather | Low |
| Tubular | Very High | Moderate to Hard | Heavy leather, load-bearing | Medium to High |
| Chicago Screw | High | Easy | Removable joints | Medium |
| Chaton | Low (decorative) | Easy | Fashion, accents | High |
| Dome | Medium | Moderate | Decorative, secure joints | Medium |
| Button | Medium | Moderate | Clothing, low-profile joins | Medium |
Conclusion
Choosing the right rivet ensures strong, durable, and attractive leather projects. Consider leather thickness, intended use, and style when selecting rivets. Follow proper installation and safety steps for best results.
If this guide helped you, please share it with others working with leather. Happy crafting!
Read Also – 4 Ways to Remove Rivets From Leather Without Damaging It